Stability Spectrum Pt. 2

INTRO

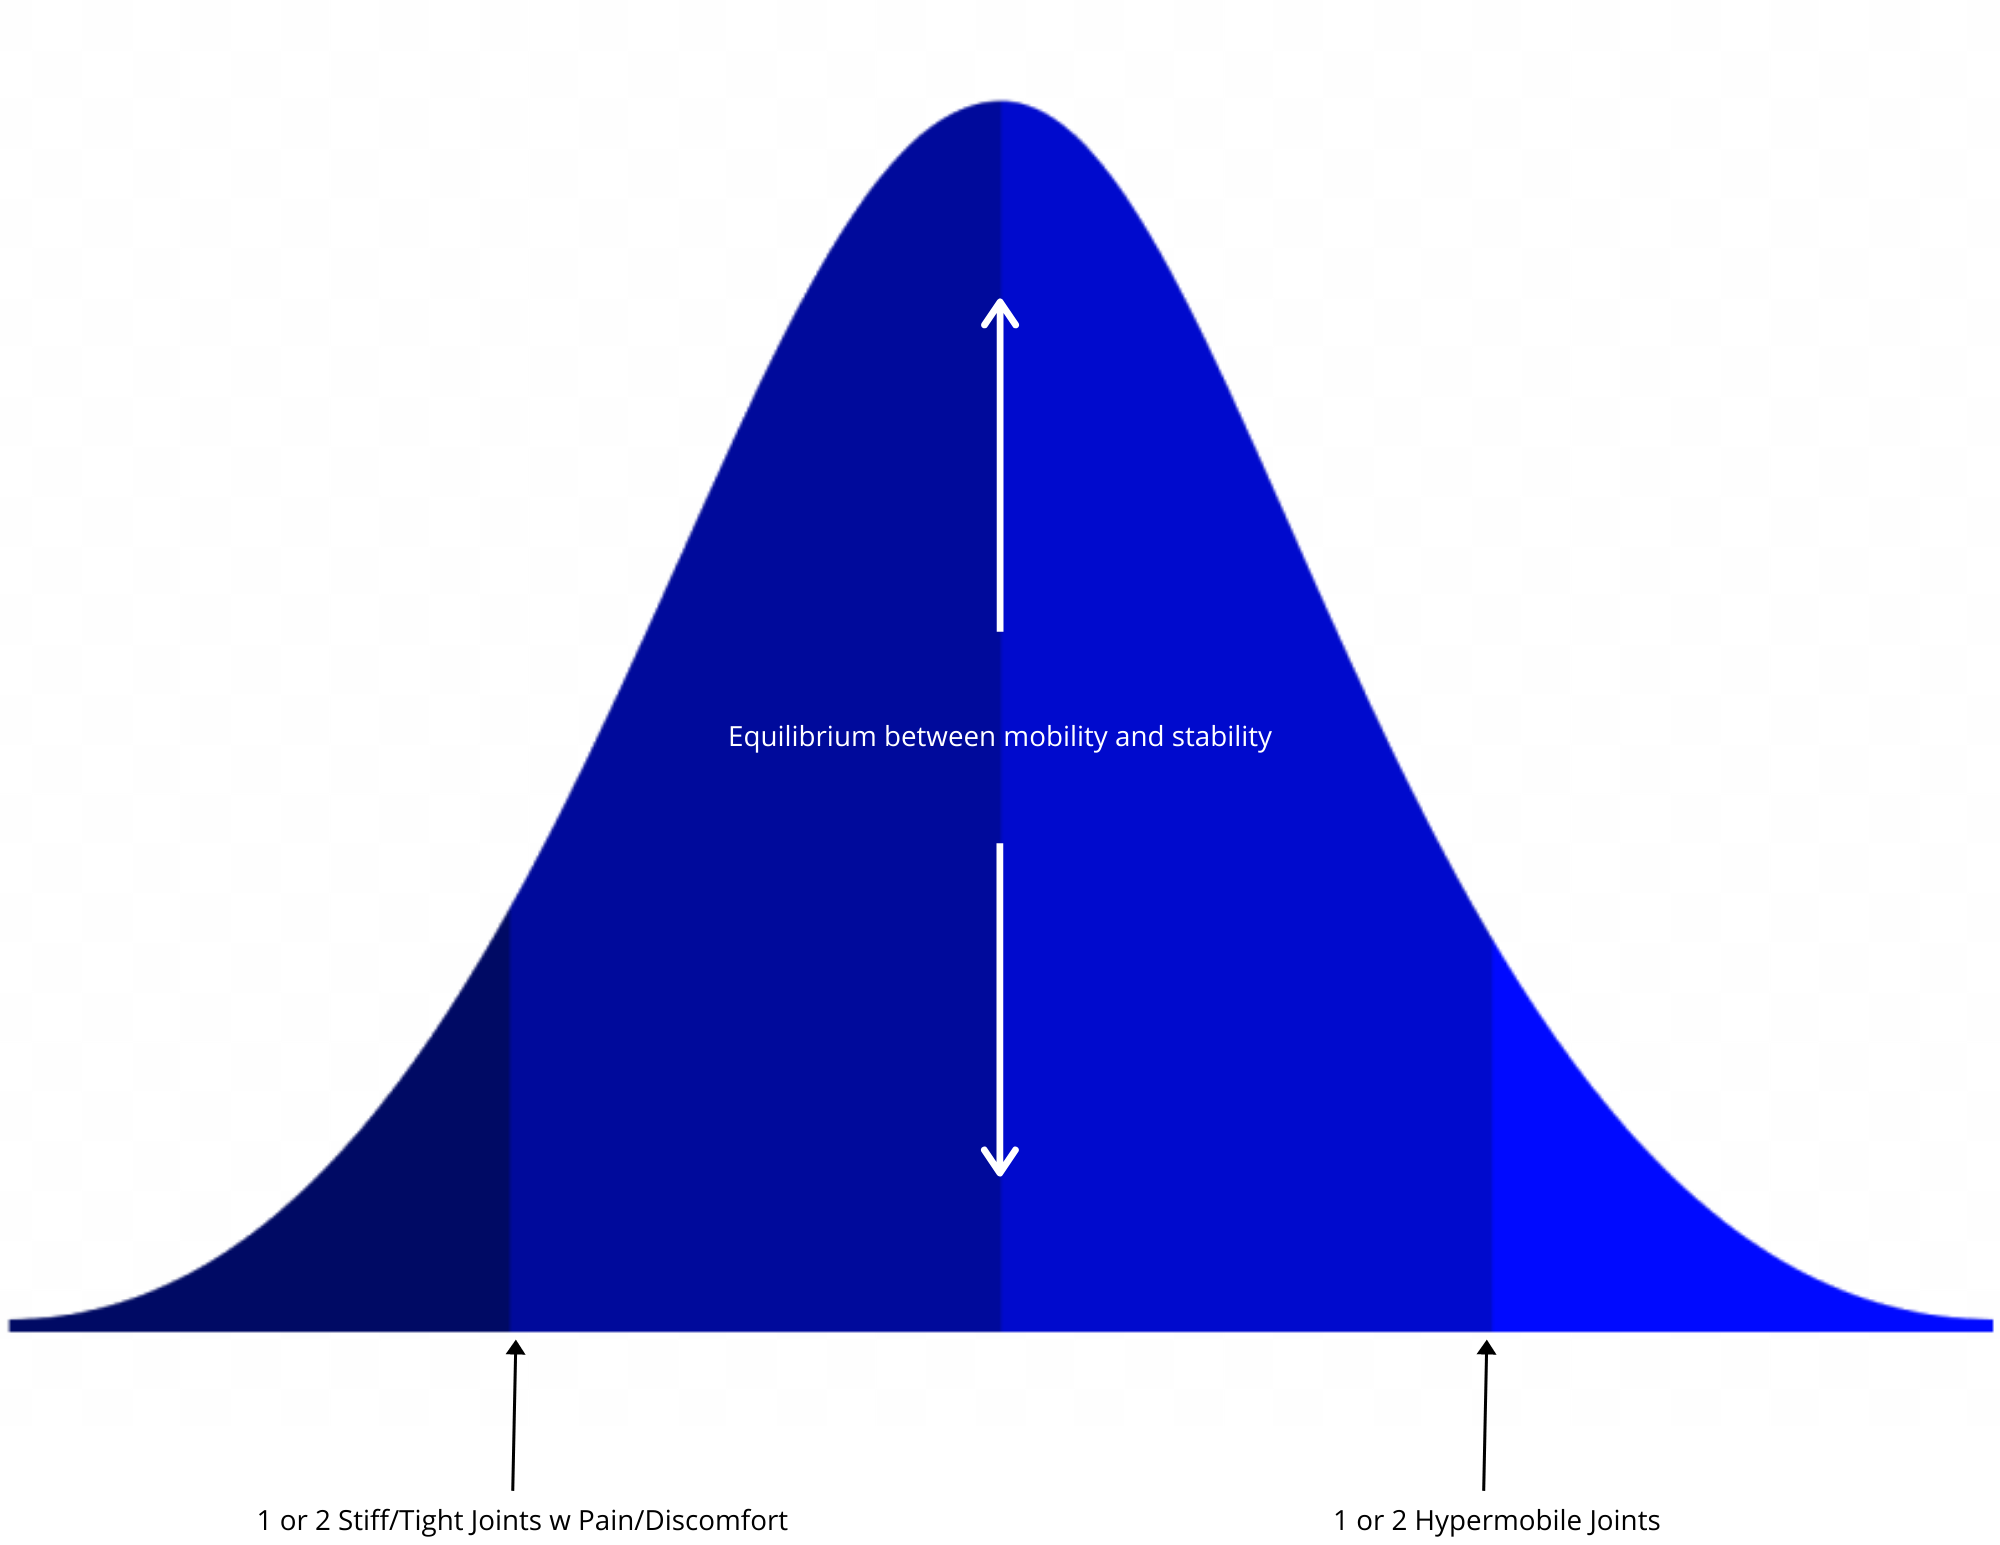
Ok. Part 2 is about tools to get you moving with better awareness and integration. At the end of the day, a lack of integration is the cause of most of the issues we face in our movement. This is true whether you’re a little or a lot stiff, a little bendy or hyper-mobile. From here forward you need to embrace the fact that there is no template you can follow to get your body to move more comfortably, safer, athletically, etc. You are responsible for creating a path for yourself. As a reminder, I’m not a doctor so this post is to be taken as anecdotal. Consult a physician before undertaking the suggested drills and skills below. For more of the “why” behind this series go read Stability Spectrum Pt. 1.

So now let’s dive into some principles I’ve come up with:

  1. Scale Your Core Work

  2. Biggest Joints First

  3. Create Support

  4. Isolation and Isometrics

There are probably others. If you’re a movement specialist you may have some to add as it relates to foundational movement/Range of Motion (ROM) training. If so, drop them in the comments. But let’s dive into each of those because they will come into play heavily once we get moving.

1. SCALE YOUR CORE WORK

All of your movement needs to start with the organization and appropriate activation of your core. In yoga, we take that a step further to suggest that movement starts with breath and intention but really, same-same. Your lungs are in your torso, are connected to your core muscles, et voila!

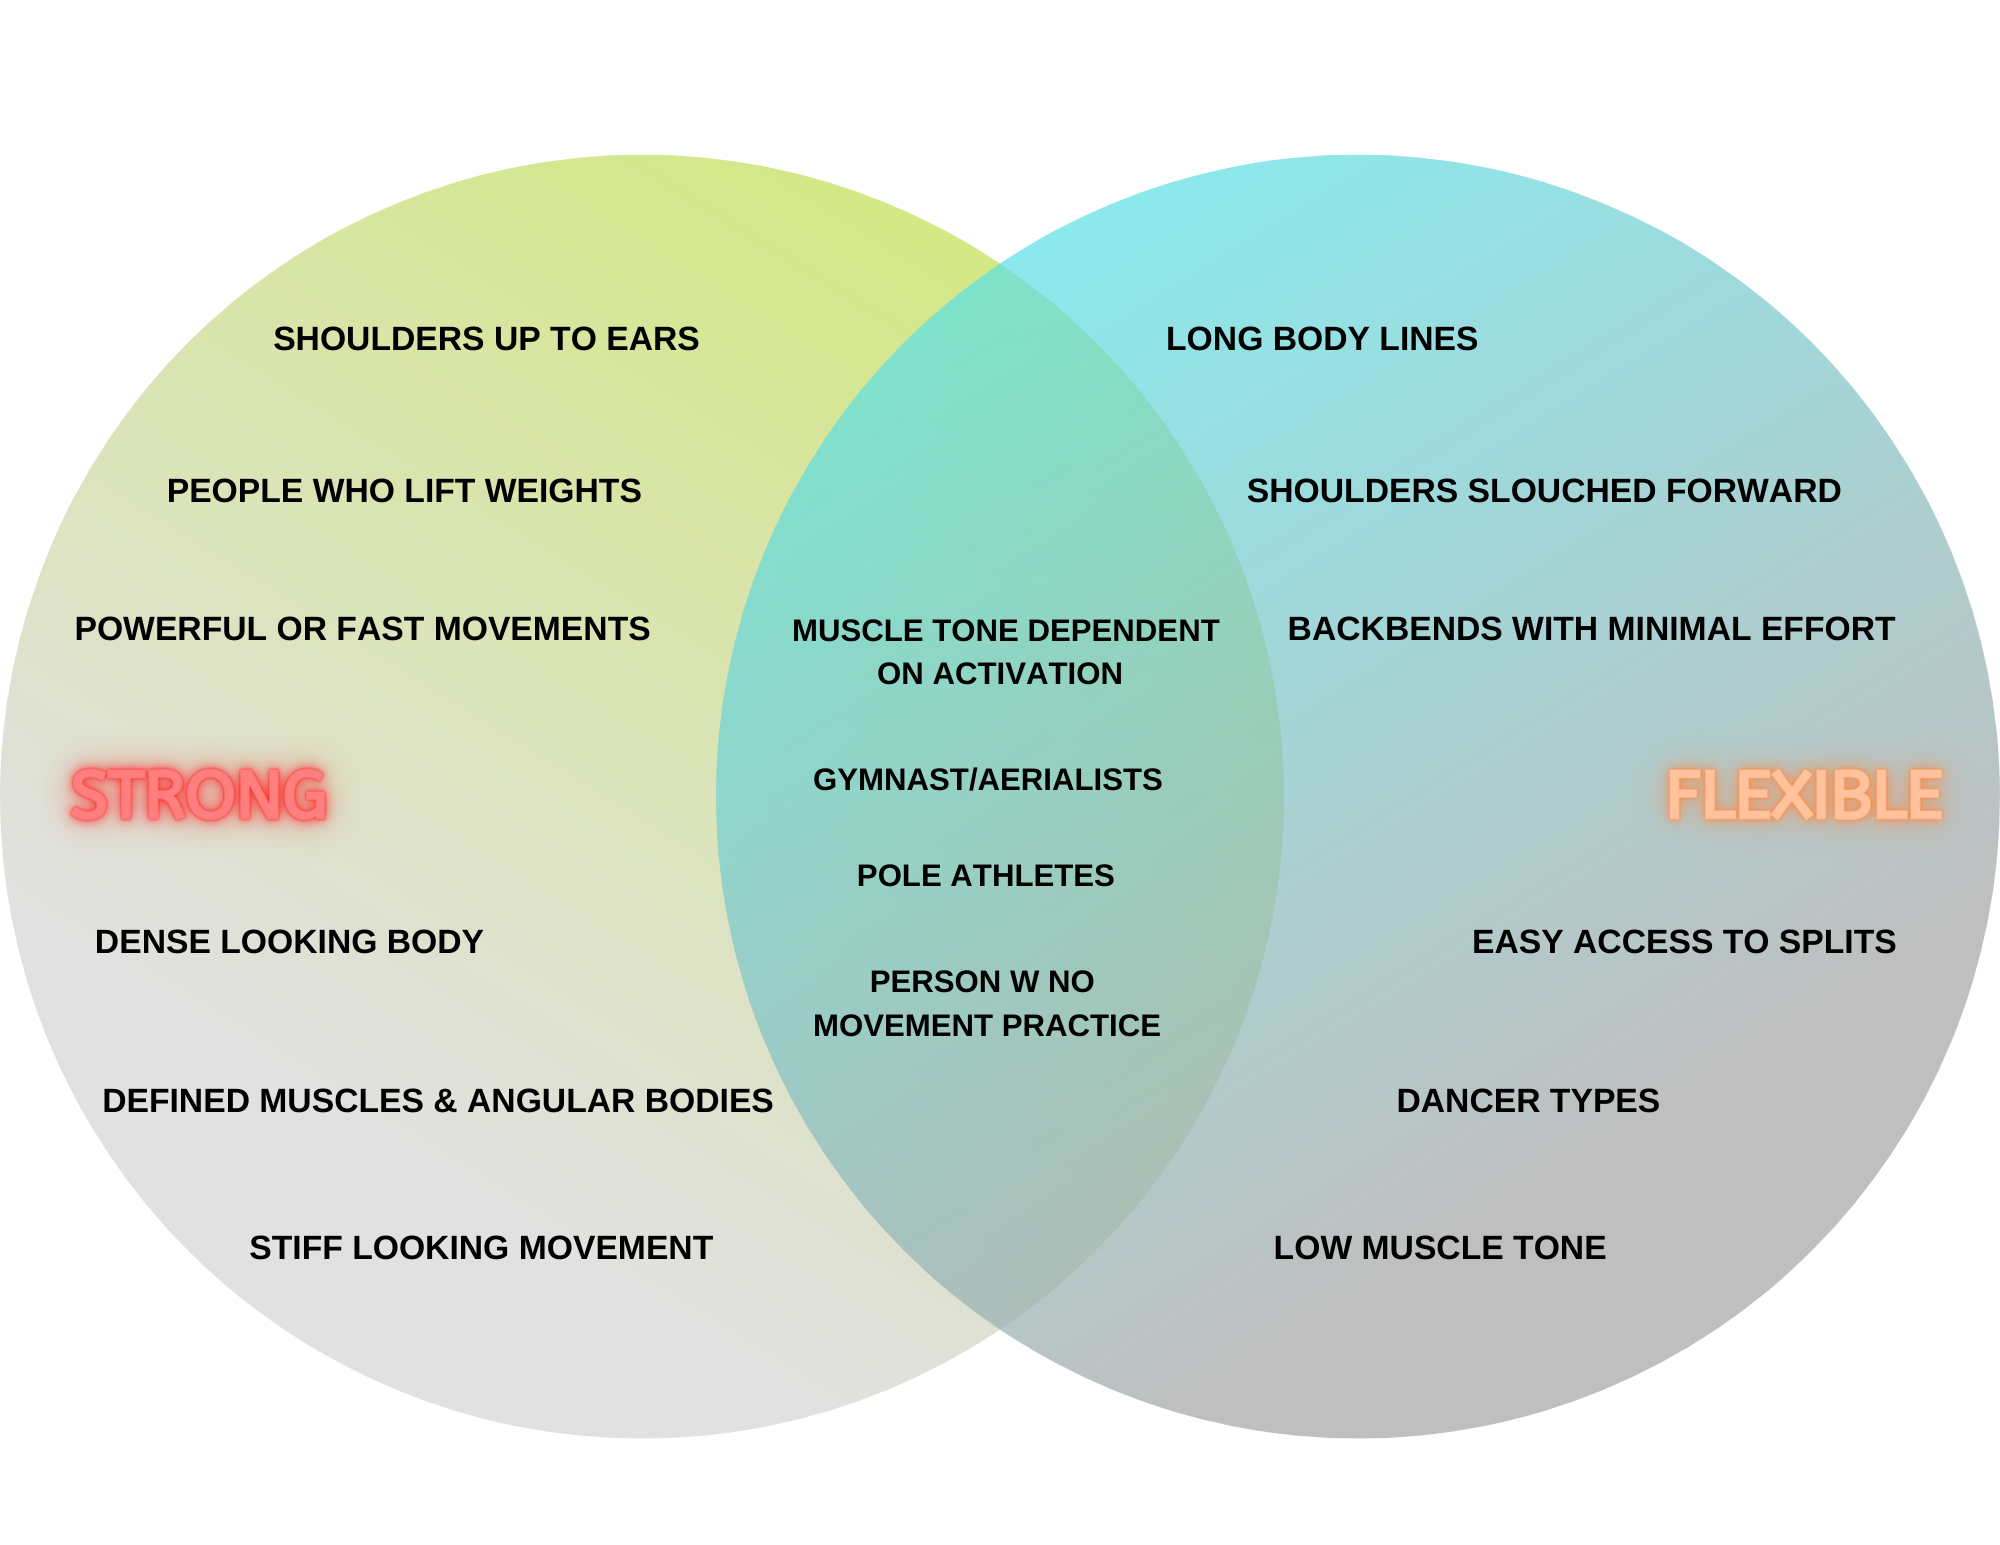
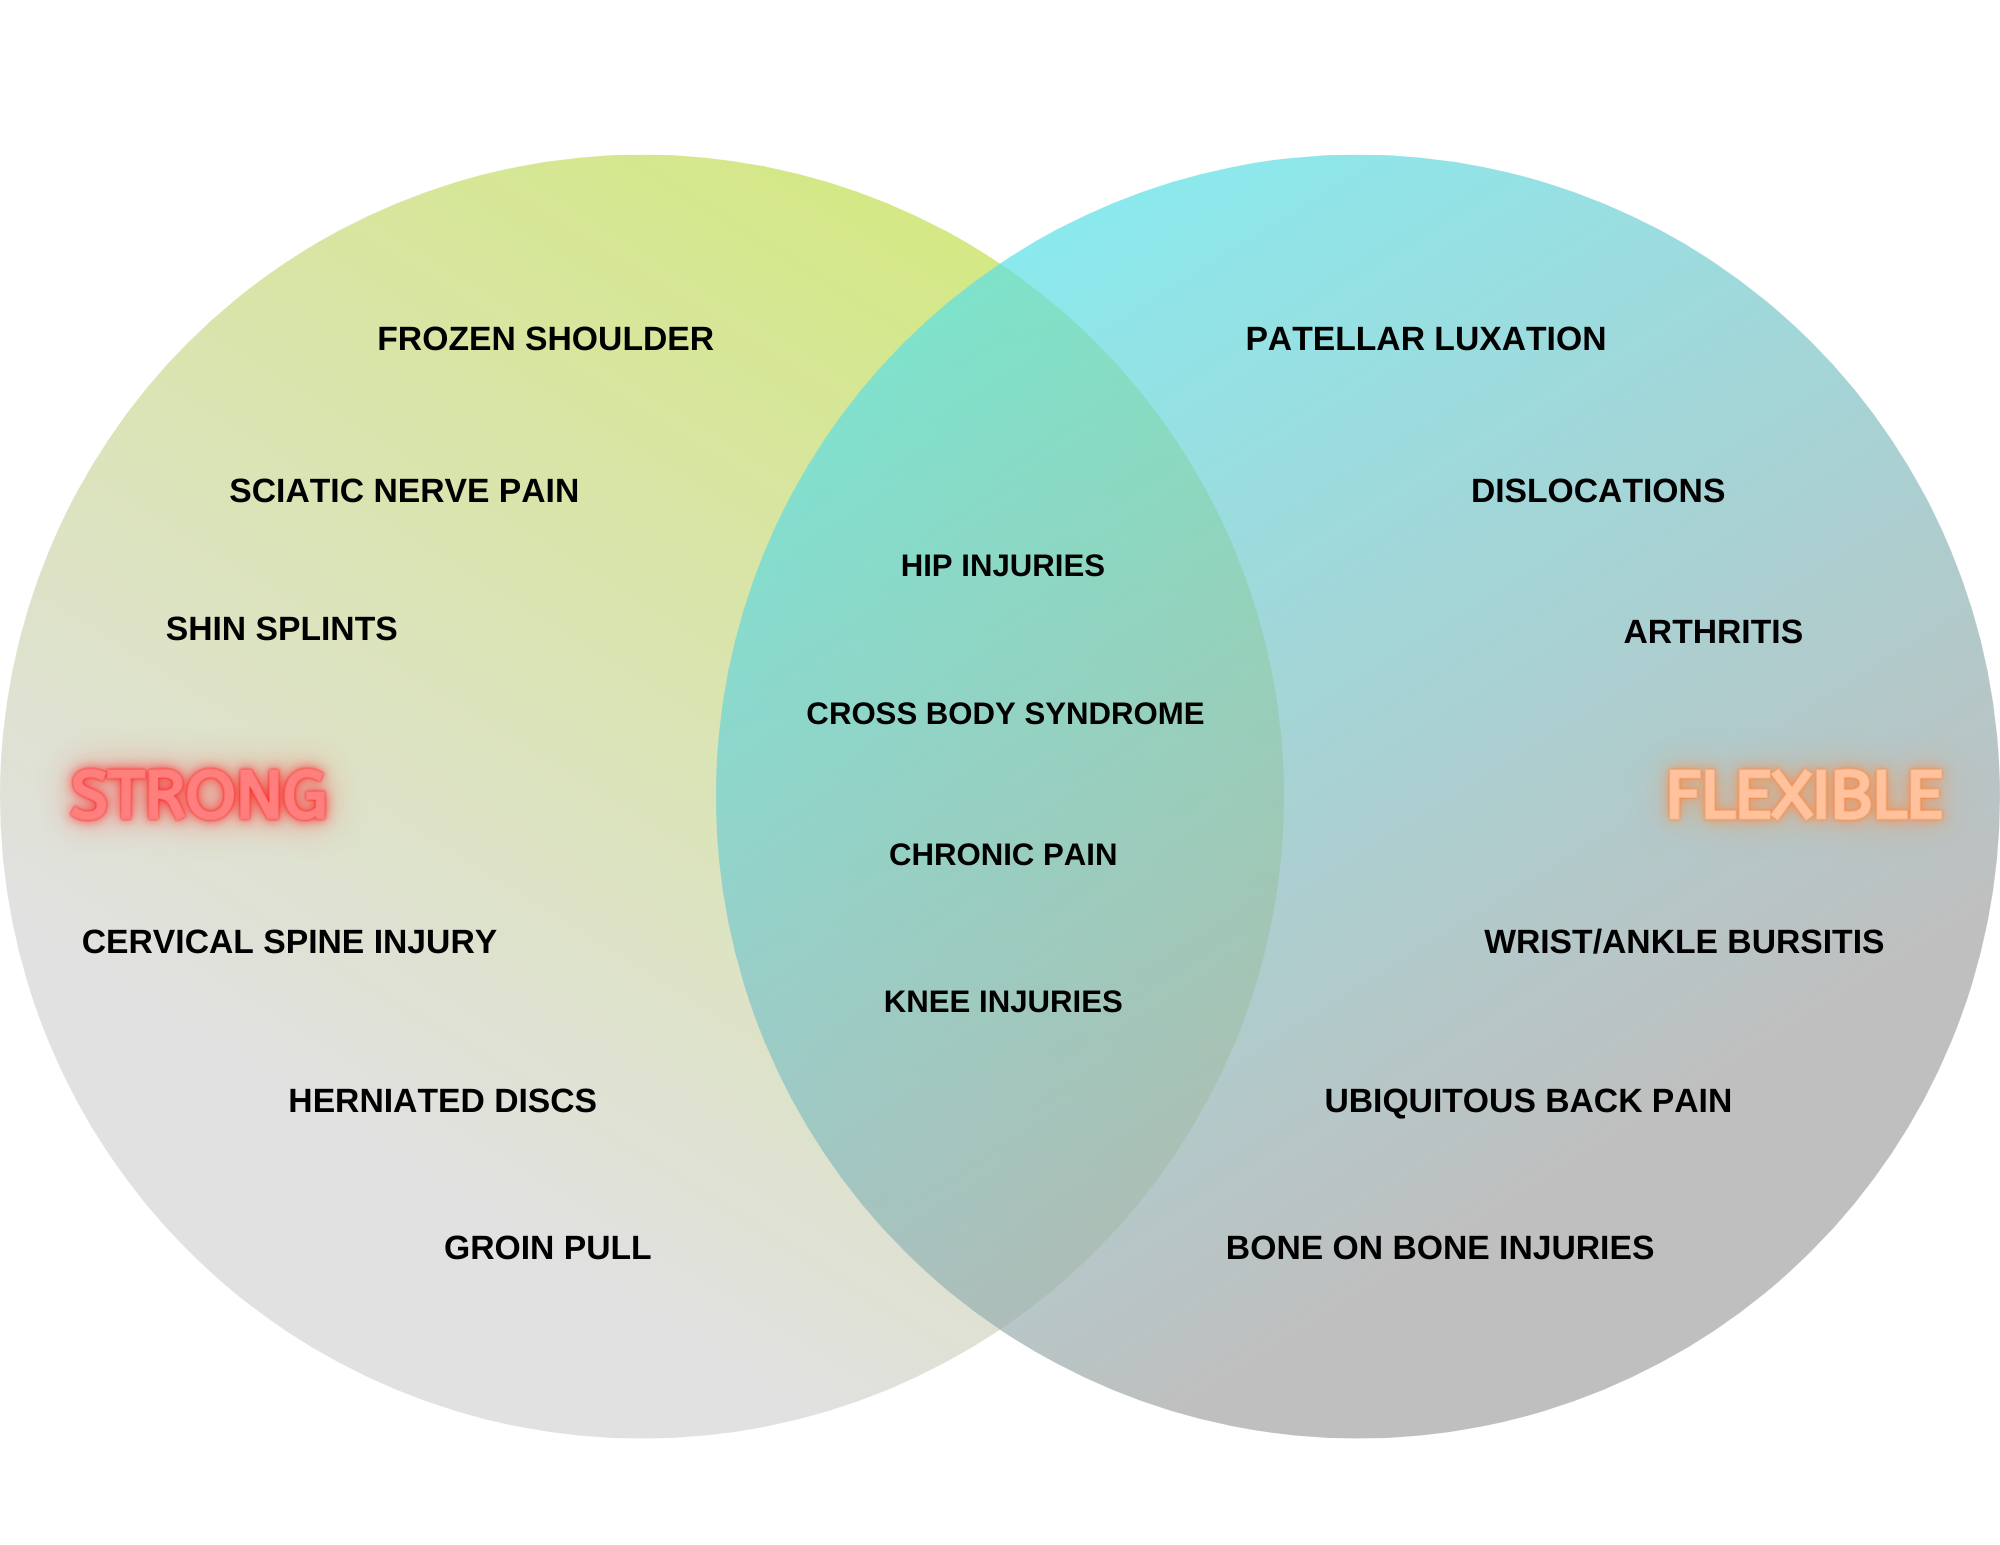
Everyone has to do core work - serious and casual movers alike. Why? If you are on the stable/stiff side of the equation and you don’t train your core, you are going to over-train your extremities. This disorganization is not good for the body, yet the body adapts and the muscles and tissue of the extremities get stronger to compensate. As you learned if you attended or read Pt. 1 - the amount of tissue you have surrounding your joints effects your ROM. You will build the muscle, lose ROM and keep going in the general direction of disorganization until injury happens. If you are on the flexibly/hyper-mobile side of things, a lack of core activation leads to chronic spinal extension/anterior pelvic tilt. Alternately or additionally, your core does not start and end in your abs. Your core starts in your feet, travels up your inner thighs and connects into the torso via your pelvic floor. Improper or lack of core activation leads to the weight of your body and organs constantly pressing down on your lower body from the Lumbar Spine downwards. This can result in compressed discs, lower body joint pain and Pelvic Organ Prolapse.

As a movement teacher, I see people doing core incorrectly all the time.

*If your core work hurts you you’re doing more harm than good!

*If you don’t feel your targeted core work in your core you’re not working it!

Core work is infinitely scalable. It encompasses breath work, weighted deficit sit ups and everything in between. We will get into examples further down and in real life. But, suffice it to say, as it relates to the asterisks, there is no excuse. You have to do core work so you might as well do it right (effectively and safely). Here are some targets to hit every time you do core work and how you will know you’re doing it right:

  1. You have to be able to breathe normally

  2. You have to go SLOW. Your surface abs are twitch muscles. They work when you go fast. Your deep core is NOT twitch fiber. It ONLY works when you go slowly.

  3. If you are targeting your core muscles and you don’t feel it in your abs and obliques, you’re not really working them.

2. BIGGEST JOINTS FIRST

When it comes down to it, our bodies are comprised of simple machines. Go deep enough down that rabbit hole with enough maths and physics and you will discover that the joint that loads first is the joint that carries the greatest load. Now in yoga, there’s a whole lot more room to get that wrong because you aren’t carrying more than your body weight. But it still makes me cringe when someone does chair and their knees jut forward before their butt goes back. If you’re stepping under a 200lbs rack for a back squat do you want your hips to carry most of that 220lbs or your knees? Your hips!! You can read more about Joint Loading Order as it relates to squatting HERE. Or if you’re brave, I recommend heading into the Crossfit Journal archives. There are good explanations of movement principles in the older material. Try to ignore the chest-beating and tomfoolery.

Biggest Joints First goes for your warm-up, your stretching, your actual athletic endeavors. It is foundational. Aside from the pure physics of it, your circulation and enervation are greatest at your biggest joints. That means moving your shoulders and hips (and spine as a unit) are going to get your hottest first and prime your body’s ability to send/receive neurological feedback.

3. CREATE SUPPORT

Sometimes you have to create support through activation. Let’s go back to weight-lifting. You breathe in and brace your core. In yoga, we go back and forth between active and passive. The support in active yoga poses looks much the same as weight-lifting. There will support from your core and possibly some attenuated bracing. However, in yoga, we get into passive stretching and in this instance, it is both helpful and necessary to recruit props.

Let’s look at a standing vs. a seated forward fold to further elucidate the point. Standing forward fold is active. It is thought of as a hamstring stretch but let me tell you - if you aren’t using the fuck out of your core to create the deepest possible hip flexion, honey you’re doing it wrong. The entire front body is active from the throat to the toes. There is little to no gap between any part of the torso and leg so much so that many long-time practitioners can put the top of their head on the top of their feet. When done properly all of the support that is needed for good organization comes from the posture itself. The position of the body mirrors the position of and is held by the front of the legs so the back body can stretch.

Now a seated forward fold on the other hand can be active or passive. Let’s look at the passive version. The point is to deepen the stretch beyond the muscle fiber and into the fascia which requires longer holds. If one were to be engaged much of the fascial stretch would go away so engaging would defeat the purpose of the passive position. So one must fully lean into the passivity. But then gaps happen. Maybe the back of your knee comes off of the ground or flops to the side. Maybe your upper body doesn’t reach your legs for support. What do you do? You create support. In this instance, you would pull pillows and other such props in to fill the gaps. Not doing so results in two diverging trends depending on your point on the stability spectrum. Tight people tend to tense and hold the position in their muscles rendering the stretch utterly useless. Flexi people tend to hold the weight in the bones of their joints even or especially if they are “all the way” in the shape. Neither scenario is good.

Ok, so that’s yoga. Now we can zoom out again. Let’s go back to the use of support in other realms. A great tool for learning the squat is a box squat. You rack the back squat, lower to the bottom, sit on the box and explode off of the box. Find ways to look at your movement. If you are an athlete, break your sport-specific movement down to fundamental shapes and vectors then put support around those shapes. Do the same for opposing shapes to create balance. Also using props for athletic movement can look like creating resistance with said props and we will dig into that next. For passive and everyday motor patterns do the same. You get into the car a certain way? How can you better support yourself in that movement pattern? Can you hold the steering wheel for support? Do you sit and type all day? Can you passively support your spine in the opposition position to create balance?

4. ISOLATION AND ISOMETRICS

Break it down to fundamentals and create resistance. We are here to create better movement, better integration, resolve pain and kick ass. One does not learn to kick ass with a laissez-faire attitude or a lack of grit. But why wait for life to throw you a curve-ball when you can make your own life harder? Think I’m joking? No! If you’re older than 22 you have probably already lived through many years of unintentionally making your own life harder and growing in the process. But what about applying that theory, mindfully to the body?

To create the kind of change you want in your body - more flexibility or more stability - you have to create challenges that cause your body to adapt. The easiest way to do this is the break things down to components. While the body IS comprised of simple machines, when you put them all together and add movement vector +/- load, things get complex very fast. So its a good thing to work your joints and muscle groups in isolation. Much of what we will do in the workshop, physically is due to just this - drill movements of one joint or a joint system (ex: shoulder + arm) in order to examine what is working and what is not.

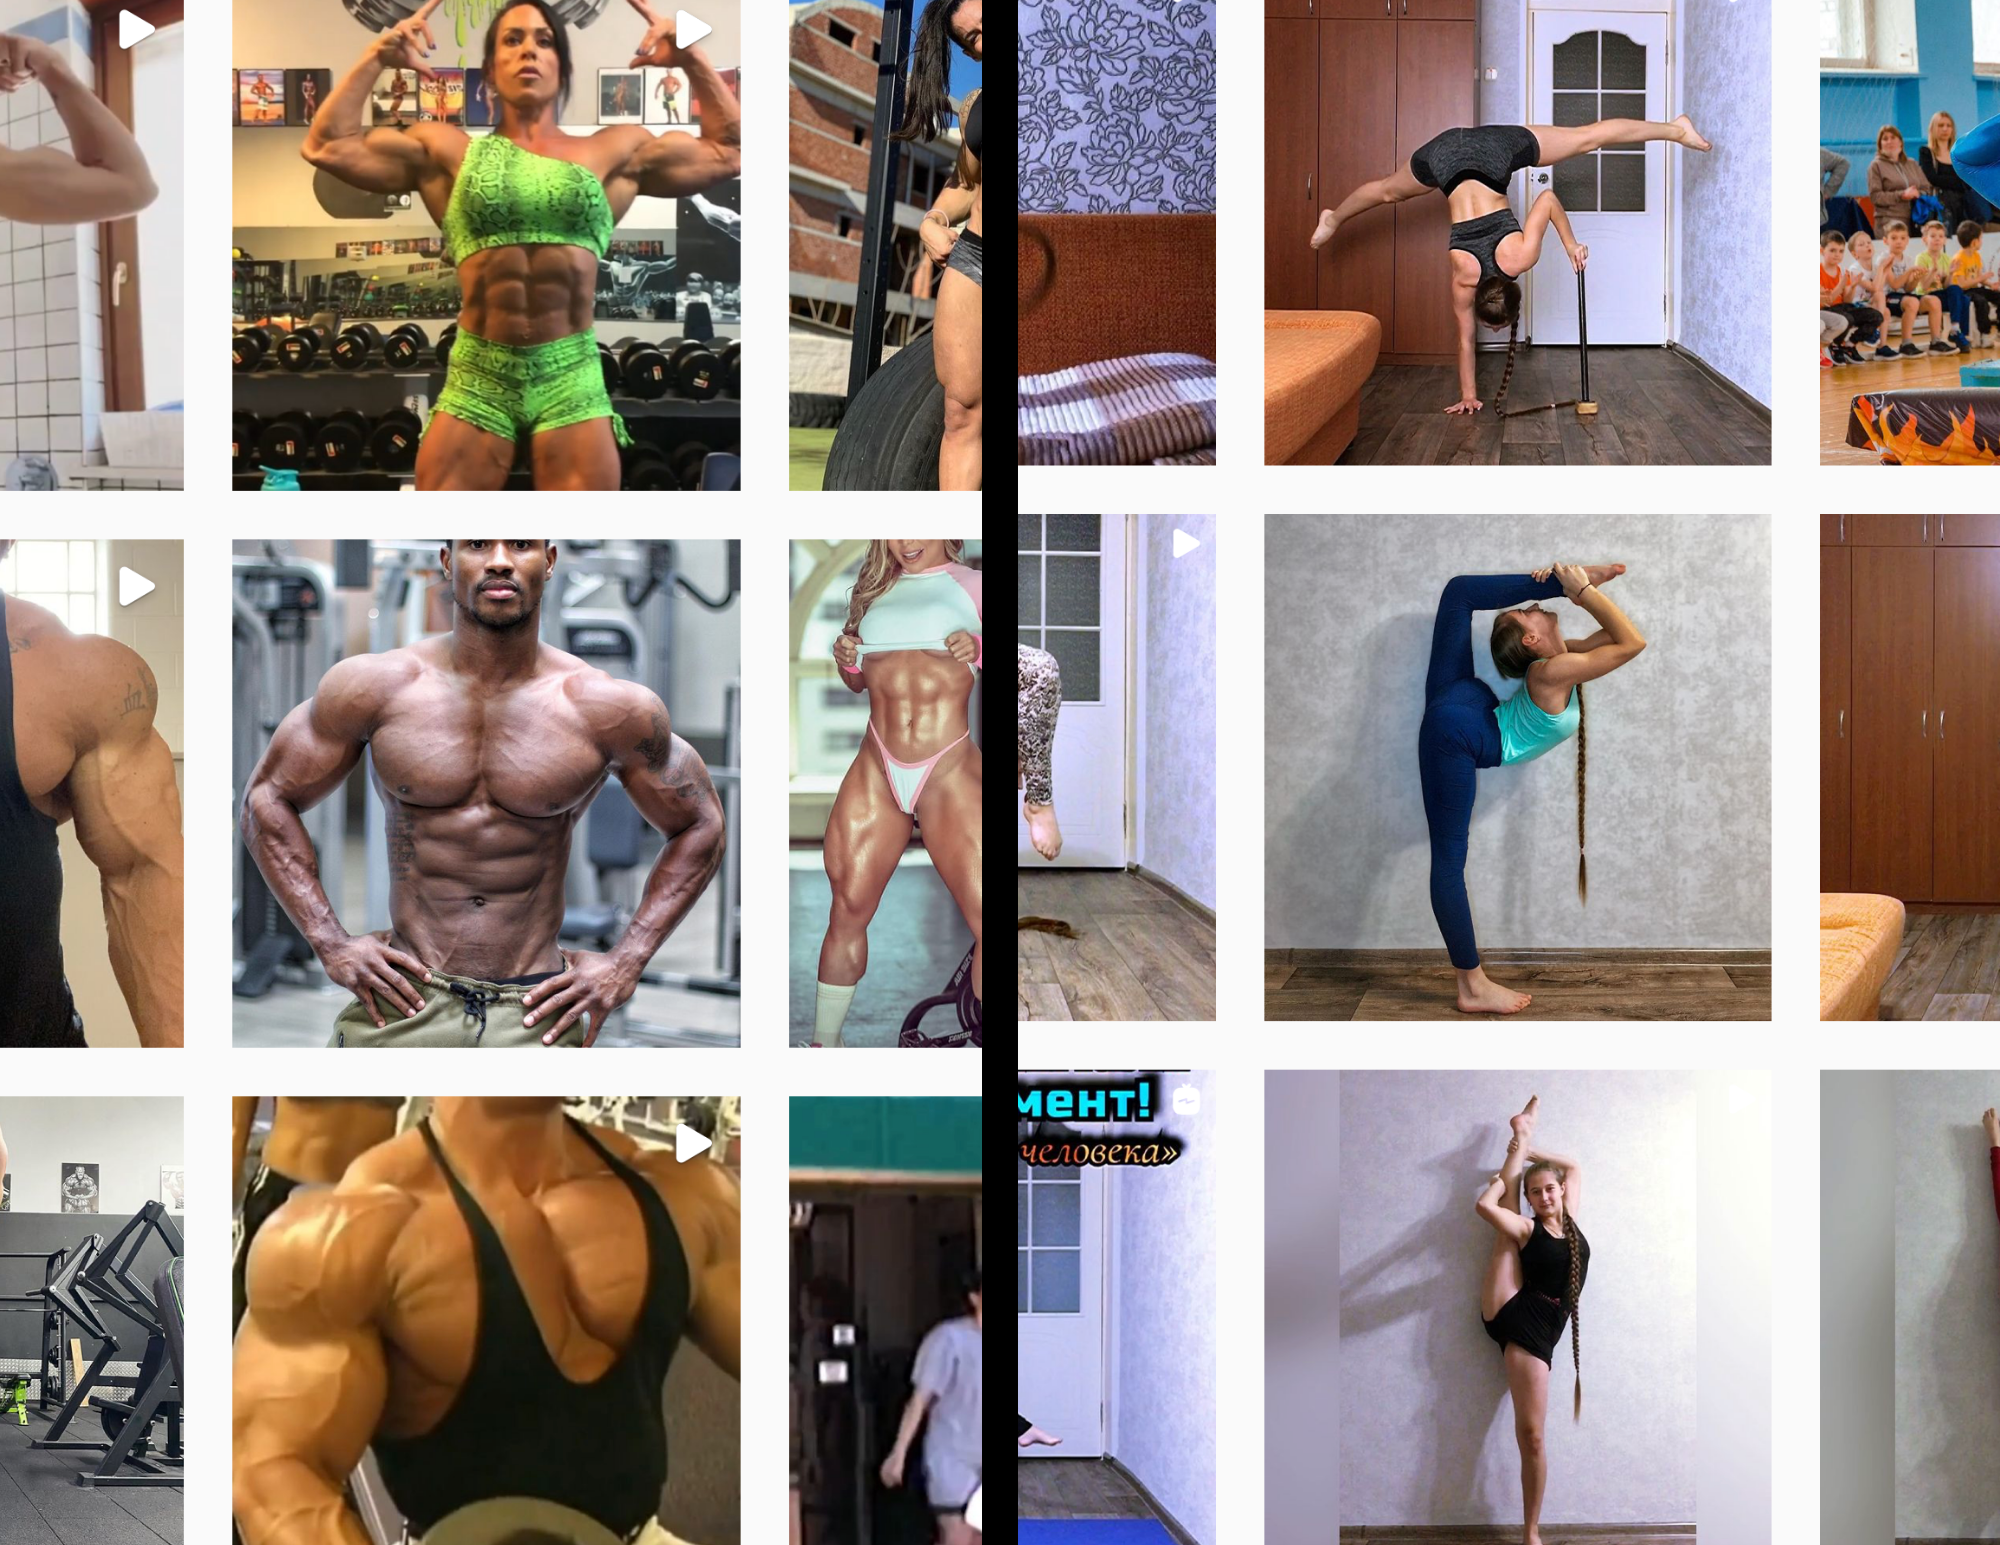
This works for people along all points of the spectrum. The emphasis for more mobile people is to isolate the sensation of the joints of the system or the single joint moving on its own - actively. The next step is to add the core back in and notice how the joint or system feels when connected. The body is built with checks and balances. If a joint has more than “normal” mobility AND the checks and balances of core/spinal position are ignored, the joint will take more of a load than it is built to and eventually injury can result. This can work in a positive direction as well. Most high-level contortionists are RIPPED. They train their core to go the whole distance with their hyper-mobile joints.

For the tight folks out there, the game is to get a read on the ROM of each of your joints. The movement is medicine. When you keep your dominant muscles from eating up every movement your body endeavors, your joints will begin to heal themselves and increase in ROM capacity. Myofascial release and muscle stretching is often essential to the process when dealing with a body that has developed a lot of muscle density.

So, that’s the isolation part. The isometrics boil down to resistance. The kind of resistance that comes from within. Sure, you could add weight and you WILL eventually get to that point. But in the beginning, the kind of resistance you can create with your own body and mind is ultimately going to be a much better teacher. Simply find your most integrated, fullest ROM - whatever that happens to be at your starting point - and hold there and breathe. Find your edge, feel it out and let your body map it. The only way to intelligently push past an existing edge in your body is to know, with precision, where it is. Isometric engagement at the end ROM will help you develop strength without bulk and it will help to develop proprioception in that particular position.

OUTRO

Try approaching your movement with these principles in mind. If you don’t already have a movement practice yoga can be a great place to start but the studio experience is not for everyone. If you’ve tried yoga in the past and been frustrated or injured you are not alone. Most yoga teachers these days know how to teach the “ideal” body to do a set sequence. They are not capable of handling your specific needs. Thus, if you endeavor to go to a yoga studio to practice, you need to go armed with knowledge of how to work your edges. If not, but you have the gumption to do it alone, there are tons of online resources to get you moving. And of course, you can always seek private instruction. No matter what, keep in mind what I said at the start - you are responsible for creating a path for yourself. If a yoga pose doesn’t feel good, don’t do it. If lifting heavy only feeds your ego, let it fall away.

There is a world of information on the internet. Movement science is not high-level worm-hole mechanics. You can self-teach to the point of being able to rehab yourself and advocate for yourself. Think of it this way - what do you think humans did while they were sitting around campfires, telling stories or stuck inside during a rainy season? Do you think they did manual labor all day and didn’t stretch? Ancient humans codified the basics of self-maintenance. Aside from maybe needing some accountability - you don’t need a teacher in $100 leggings, a former ballerina, or a person with a fancy degree to tell you how to move your body (until, maybe, you get to the upper levels then everyone needs a coach). Start small, move slowly, breathe deeply. Your body will take care of itself and you if you let it.

Below are some helpful videos for putting your joints or muscles or both through the paces. We will be doing some of these in the actual workshop but not all. This is not an exhaustive list but I’ve tried to give a little something for all parts of the body. As always, thanks for reading and I hope you find this useful.

RESOURCES:

Shoulders

https://www.instagram.com/p/CP3qFPNjJll/

https://www.instagram.com/p/CP0usoGj_cR/

https://www.instagram.com/p/CPrbLznMmuv/

https://www.instagram.com/p/CO3x1jjnREO/

Hip

https://www.instagram.com/p/CP6NYfQMUif/

https://www.instagram.com/p/CPV5hrsjx_6/

https://www.instagram.com/p/CPTQchNsKsk/

Knee and Inner Thigh

https://www.instagram.com/p/COLHtxss_wF/

https://www.instagram.com/p/CPqkTKDDSxP/

https://www.youtube.com/watch?v=FdofViBpO-U

Spine

https://www.instagram.com/p/CPl2T0bsiEj/

https://www.instagram.com/p/CJJh3lelY_q/

https://www.instagram.com/p/B5xiKg_hZtO/

Foot/Ankle

https://www.instagram.com/p/CPOIuH7Djzi/

https://instagram.com/p/COqIfrOJQa0/

https://www.instagram.com/p/COlaOIipGtV/?utm_medium=share_sheet

https://www.instagram.com/p/CORmHHgp1zP/?utm_medium=share_sheet

https://www.instagram.com/reel/COMWXd-pkza/?utm_medium=share_sheet

Hamstrings:

https://www.instagram.com/p/COqLdoOjwf0/

Hand/Wrist

https://www.instagram.com/p/CNTGH13MSkn/

https://www.instagram.com/p/CMzmGnnsQgn/

https://www.instagram.com/p/CP3p59Flrep/

https://www.instagram.com/p/COvE9V3Mf6n/

Core:

https://www.instagram.com/p/CO9DW9SpTkM/

https://www.instagram.com/reel/CPRXuDrh3b3/?utm_medium=share_sheet

https://www.instagram.com/p/CMM9m3FB13K/?utm_medium=share_sheet

Especially for hyper-mobile athletes (but also for everyone):

https://www.instagram.com/cirque_physio/

Especially for tight muscles and fascia and rehab (but also for everyone):

www.triggerpoints.net

Stability Spectrum Pt.1

INTRO & DISCLAIMER:

This is a written resource intended to be supplemental to my workshops on The Stability Spectrum. Most of what is written below will be useful as a stand alone source of information. If something needs clarification, it is likely because this is support for a real-time course, not included. Chances are, an online search will help you to gain further understanding. Or, if you have specific questions or concerns please drop them below in the comments. Remember, I’m a yogi and do not hold a doctoral degree in any medical or sport-related field. Use this information appropriately and with guidance from your doctor if there is any question at all about its safety or efficacy for you, personally.

WHY AM I TEACHING THIS WORKSHOP SERIES?

I’ve been teaching yoga since 2014. I’ve been coaching other movement since 2012 and I’ve been an athlete my whole life. I’m a trained researcher and have spent years accumulating knowledge outside of the academic context to apply to my own body or to give me a different lens by which to view the bodies that come to me for training. In the process of teaching and observing others, I noticed people tend to cluster toward one or the other starting place in their movement endeavors. They are either in Group A - “Flexible” or they are in Group B - “Strong.” I’ve made a diagram to illustrate my thinking. These are loaded terms but I’ve chosen them for a reason - because they both highlight what are considered to be desirable traits AND you don’t need to know special terms to get the idea I’m trying to convey. They do not, however, do a good job of describing what’s going on beneath the surface for either group. We will get into that momentarily. For further illustration of the point, see the graphics below. CAVEAT: we are working off of stereotypes so don’t get too invested…

 
Strong.png

Static and Motion based characteristics of “strong” and “flexible” people with some examples of overlap.

Strong-2.png

On the left sample “strong” bodies from a basic Instagram search #strong and on the right an Instagram search for #flexible


Injury happens, discomfort happens, pulled muscles happen, compressed vertebrae happen…right? Yes. They do. But they don’t have to, at least in theory. The two groups above, in addition to having distinct characteristics of what they look like standing and in motion, also have a tendency to accrue injuries, aches and pains and maladaptive motor patterns in divergent ways; with some areas of overlap as well.

 
Strong-3.png

Classical injuries/ailments experienced by “strong” or “tight” people, classical injuries/ailments experienced by “flexible” or “hypermobile” people and areas of overlap.


WHY CONTINUED…

In my personal experience I started in the “strong” category. I have experienced stiffness, discomfort, an inability to find good alignment in hand balance leading to chronic shoulder pain, sciatic nerve pain from a hamstring pull, etc. Over the years I have healed all of the above and am continuing to evolve my practice.

It so happens that, of my private clientele, more than half are working with me because of injuries related to hypermobility. These include patellar luxation, bunions, bursitis, hip capsule injuries, etc. We are continually working to re-train motor patterns that keep my clients’ bodies safe.

But in my everyday teaching experience, of which I have accumulated about 4,000 hours, I see people like me and people like my private clients mixed together in a class. As I gained experience, I started to notice these different populations. Listening to students, I started seeing patterns and how a standard yoga class assumes a body that possesses both strength and flexibility as a starting point, when in fact, many people are lacking in one or the other and sometimes both in drastic ways.

This online resource and the accompanying workshop are my first attempt to codify some of what I have observed over the years both in terms of problem areas and in terms of tools to resolve the problem areas. The good news is, the methodology is more or less the same for both groups of people! So below we will get into more technical definitions of “strong” and “flexible,” how to identify those patterns in yourself and from there we will take a look at some resources I’ve found to be of great efficacy over the years.

Definitions

As previously mentioned, the terms “strong” and “flexible” are good to get started but otherwise inadequate for the following conversations. So, let’s keep the general concepts but replace those two words for more meaningful terms.

In this conversation we will now convert “strong” to “stable.”

Stability is the ability to maintain or control joint movement or position. Stability is achieved by the coordinating actions of surrounding tissues and the neuromuscular system.

Instead of “flexible” we will now use “mobile.”

Mobility is the degree to which an articulation (where two bones meet) can move before being restricted by surrounding tissues (ligaments/tendons/muscles etc.) - otherwise known as the range of uninhibited movement around a joint.

In an ideal world these two abilities work together in tandem for a perfectly balanced system where no one get hurt except through external forces. But the real world looks like these two abilities being out of balance in most bodies to the degree that a person ends up in one or the other camp. To visualize this let’s bring back one of my favorite teaching tools from Psych 101 - the bell curve!

The Bell Curve

NOTE: The graphical depictions below are my approximation of things, not based on personal research or study. Real studies do exist if you want more precision.

454-4548871_svg-bell-curve-vector-hd-png-download.png

The Bell Curve

The term "bell curve" is used to describe a graphical depiction of a normal probability distribution, whose underlying standard deviations from the mean create the curved bell shape.

Let’s apply the concepts of the Stability Spectrum to the Bell Curve and see what we get….

Strong-4.png

0, .5 and -.5 on the Bell Curve with our variables applied. Notice how the Bell Curve is a spectrum with a big bump in the middle.

Referencing the version of the Bell Curve (above), we start at the zero-point or the middle. Here, a person has full use of their joints in a way that is supported by their muscles and other tissue. The given range of motion (ROM) for a joint is determined by examining a wide variety of factors including the shape of the joint itself. We will take a look at the other factors involved a little later as most of the variables factor into where a person falls on the Stability Spectrum. You will also notice above, two points equidistant from the center. If we were talking pure numbers these points would be labeled .5. That is to say they are about half of a point away from the mean, taken here to mean the statistical average. On the Bell Curve, whatever is being measured is less “average” the further away from the middle it gets. At .5 away from the middle, you’re still looking at things most people would consider normative. In our example, someone who has one or two stiff joints or someone who maybe has open shoulders even though their hips are tight would not be considered extreme cases (we will discuss exceptions in the workshop). Since in reality most people don’t have full range of motion with support from surrounding tissue, the above is an idealization. In most circumstances, if you were to actually measure people and create a statistical average ROM, the mean would probably skew toward the tight side of things. The Yoga Dojo is an example of a community or cohort where, perhaps, the mean would skew toward the mobile side.

The Bell Curve - Tails

Strong-2.jpg

The further you move away from center on the Bell Curve the further you get from the statistical average. Here is 1+, using our model of mobility. At this point, the manifestations begin to look extreme compared to the middle of the pack.

Here’s where the conversation gets a little interesting. The further you move away from center the higher the number. So this Bell Curve (above) shows +1 and -1 and beyond. This is where, the people in our discussion would start to have congenital joint issues like club foot, or on the other end have Ehler’s Danlos Syndrome. The size of the Bell Curve drops off steeply here. That is because there is a rapidly diminishing number of people at each point. The two differently colored ends of our spectrum or Bell Curve are called the “tails.”

It is through examining the "why” behind the conditions at the tails that we get a really good understanding of what is at play for the rest of us back toward the middle.

Factors

Where you fall on the Stability Spectrum is going to be a combination of many factors. Your joint ROM is the quickest and dirtiest assessment of where you fall. As mentioned previously, there are multiple factors influencing ROM…

Bone Morphology - The shape and angles of the bones in the joint and leading into the joint. For this purpose you can think of all joints as simple machines. The length of the limb leading into the joint will create different leverage and torque in addition to the shape and angle of the joint itself. Ex: Press Handstands

Movement Practices - the regular degree through which a joint is asked to move. Ex: Sedentary lifestyle vs. Professional Athlete

Tissue Properties - Muscles, ligaments, tendons, even skin surrounding a joint have a predisposition to different properties. The assumption is that these tissues are all functioning normally. Changes in tissue function effect the stability or mobility of a joint.

Genetics/Diet/Age - The genes you inherit influence your morphology, tissue composition, how your body processes the raw material you consume as food and how these variables evolve over the course of your lifetime.

Injury - Accute and chronic use injuries can impact one or more joint’s ROM in a sudden and drastic way.

When you’re measuring a “normal” body it is sometimes difficult to see how the above factors relate to one another. It can be hard, for example, to look at my own body and say “Well what came first? Tight muscles? Tight ligaments? Is the tightness genetic? Is it emotional?” We have the people living in the tails to thank for some of the greatest insights about our body as a system. It is through studying communities like the EDS community, that we are able to understand the role genes play on collagen formation and thus joint health. It is through observation of patients undergoing physical therapy after surgery and injury that we are able to examine how large changes in ROM effect the body as a whole. The body is indeed a system. It is very difficult and maybe impossible to isolate any ONE of the above factors as being the definitive reason for where you fall on the Stability Spectrum.

Assessment Tools

Baseline measurements can be found below as well as some definitions of extension, flexion etc:

BASELINE ROM

A quick test for Hypermobility can be found below. Notice, we have not defined Hypermobility in writing. There is a wide range of what Hypermobility can mean and secondly there is no direct antonym or opposite. You can take it to mean greater than baseline ROM in one or more joints OR you can find a more detailed explanation here. The quick test for Hypermobility is called the Beighton Score. There are two links below both showing the criteria for the test with some novel and redundant information:

BEIGHTON SCORE 1

BEIGHTON SCORE 2

So what about the tighter people reading this and participating in the workshop? For you we have some standard flexibility tests ala gym class in primary school. If you want to get fancy - grab a friend, a protractor, ruler and tape measure. The tests after the link below more or less run you through the ROM for your major joints. Get your friend to measure the angle with the ruler and protractor and some of the sit and reach scores with your tape measure. That is what we will be doing in the workshop!

FLEXIBILITY TESTING

Final Thoughts for Pt 1

Ok, how’d you do? If you came away with a couple of hyper mobile joints, congratulations! You are in the approximately 25% of the population who has one or two hypermobile joints. If you your self assessments or the definitions on the Hypermobility page started sounding alarms, this would be a good indication to follow up with your doctor. Severe connective tissue disorders are rare BUT maybe some of the aches and pains you experience are related. Part 2 of this series will address some immediate tools you can use and modifications you can make to your movement to keep you safe in the mean time.

Tight? Chances are you already knew it! But likewise, if you are experiencing limitations in a generalized way, or severely in more than one joint, that’s what part 2 is for.

Perfectly balanced specimen? More power to you my friend. Chances are you already do some of the exercises and drills I’m going to show everyone in part 2. Join us anyways and be my movement model!

Knowledge is the key to moving forward. We aren’t conducting peer reviewed double blind experiments here, but if you can’t use yourself as your life’s greatest experiment and keep notes accordingly what are you even doing? These are the sorts of activities people used to do when screens didn’t exist. Its through just this sort of curiosity and experiment that yoga was born.

We are at a temporal nexus of ancient and modern knowledge coalescing. Disparate practices with esoteric focal points are pooling resources to evolve new Gold Standards. Its an amazing time to be a mover. Today, we know more about moving and the human body than every before. I’m looking forward to part 2 where I will share some of the best tools around for creating happy joints and healthy tissue that I’ve found in the past ten years.

Questions and comments below 👇.

Thanks! 😊🙏

Touching In With The Past - Vintage Yoga Flow

I’m trying to archive old hard drives. I have like 40Tb of data that all needs to go into deep storage and be organized. Yes. That is 40, 4-0, no typo. I have enough data to warrant buying a RAID array. Anyway, I’ll save you the multiple wormholes those first two sentences sent me on. I came here to say that I posted some of my “vintage” yoga flows to my Congruence Yoga Youtube channel.

I practiced to “Challenging Upper Body and Core Flow” a couple days ago and I wanted to share it with you here as well as some thoughts since hindsight and all…

…Thoughts

1. I am so glad this phase of hair is no more. I couldn’t get my hair out of my face without what I call “The Unicorn Pony.” I have had so many different hair styles over the years. I think on this website alone you will be able to count at least 4 or 5. The Unicorn Pony was a necessary evil in growing my top knot out but damn. Not a fave.

2. My body has changed so much and also very little. It took about 6 months postpartum to get back to my normal weight range. Five years later and I’m still hovering in that same zone. Where I carry fat, muscle density, tone, etc. are all in constant flux. If I’m lifting I look different than if I’m walking, skate or doing yoga. But my overall weight is remarkably consistent. More noticeable to me is how I move. I look stiff here imo. I will never be hypermobile. I am just simply not expressing that gene, though it does run in my family. I have made huge strides in looking more fluid in my movement from this video shot 4 years ago but even to this day I find it surprising to actually see MY body get into some of the shapes it does. The way I get into flexy shapes is so different than how more flexible people get into the same shapes.

3. Wow. My pincha has come a long long way.

4. I’m immensely proud of my sequencing and cueing. This was a very challenging flow that incorporates methodologies that are just now being highlighted as “foundational” to any movement practice. And I was doing those things in very creative ways four years ago. I’m talking functional range training, spiral movements, breath-work and more. Not only that. I really did and still do my best to honor yoga’s roots when I’m teaching. I try to teach YOGA not just poses. I think that comes through.

5. Teaching at Thunderbolt was hard but it really elevated my teaching game. Some of that came from without. Carly gave me a limited structure to work within. The challenge then became to test the limits of the structure without stepping outside of it. I worked very well in that environment. Until I didn’t and that is a different story. For the most part, structure aside, my teaching is an offering of mySelf beyond self. I teach from a place of joyful creativity, expression, healing and intuition. The recordings for the video come from live classes I taught. Its a style I borrowed from Black Swan Yoga and I still prefer this format to pre-recording in a booth, teaching model students or dubbing over after the fact. You get to hear a moment in time that will never be re-created and I think that’s really special.

Five is an arbitrarily good number to close it out. I hope you enjoy this flow. Share feedback, successes, ask questions in the comment here or Youtube. Om shanti, shanti, shanti and thanks for your time.

140908 Yogi Time Lapse - This is how to lotus

Warrior poses and handstands and one-leg balancing postures and down dogs and planks, and cobras - yep, all great poses. Those poses only help, minimally, however, in developing the lotus seat - padmasana. If you only have a rigorous asana practice you are missing out on some of the biggest benefits of yoga derived from sitting and meditating. It is widely agreed that the lotus seat is one of the best postures for meditation. This is due to the natural torque that occurs in in the hips which in turns grounds the ischium. The reciprocal energy of the legs into one another and then into the ground and a similar transference between the ischium and ground allows energy to be drawn into the pelvic floor almost effortlessly. In turn, through controlled breathing, the abdominal diaphragm lifts the energy though the anterior and posterior planes of the trunk, into the chest and when the shoulders are relaxed the chest has room to fully expand. Thus, this particular seated posture allows for the greatest ease and expansiveness with breath. With an appropriate dristi or focal point, the neck continues this unbroken transference of energy all the way through the spine from tailbone through the crown of the head. 

Such economy of energy transference is hard to replicate in other poses. In my experience "easy pose" or sukkhasana requires more trunk stabilization as does bound angle (boddha konasana). Child's pose (balansana) or kneeling are good options but the compressive element of those poses puts the shins, ankles, calves, and feet to sleep when held for a long time. Savasana or "corpse pose" is great for economy of movement but the challenge in that posture is to keep your meditation from turning into sleep! 

So how do you get into lotus? Have you tried only to have too much pain in the knee or ankle to get all the way situated? For some the lotus seat is easy. The hips are naturally very open, their legs are long enough that the angle for the knee is less severe. For many, however, lotus is anything but comfortable and just about unattainable. I fell into the latter camp my entire yoga career until just this past month.

A year ago it was pointed out to me that my ankles were turning under or "sickling" when doing poses like pigeon, cow-face pose and in half lotus, fire long pose - really the list was very long. For me, unlocking lotus started with fixing my ankles. The ankle is intended to be either extended - nice and straight with the toes expressing that straightness by pointing OR the ankle can be in some degree of flexion as in when you are standing on it. Problems with the ankles start in the bottom of the foot more often than not, though mine actually was a combination of poor foot placement during walking and old soccer injuries. People over-weight the outside of the foot when walking and that translates to the seated position. The outside edge of the foot begins to turn under and there is an outward bowing of the ankle joint placing a LOT of stress on the lateral ankle ligaments. I started by making sure my ankles were either expressing full flexion or extension in each of the poses above.  Two things helped me get my foot into really good flexion -

1) When possible use your hand or another body part to give the foot feedback. If you walk wrong chances are the second you try to put your foot into flexion without the floor underneath it you will default to your bad walking pattern. Use your hand on the bottom of your foot to simulate a floor and root down the base of the big toe and pinky toe as well as the heel to get your foot flat and start to re-train appropriate flexion at the ankle.

2) Flare the pinky toe. Yogi toes look ridiculous at first but aside from the surface area they provide for balance, this simple flaring of the toes pulls the muscles of the plantar fascia and arch wider, stretching the bottom of the foot which in turn makes ankle flexion a LOT easier. 

So after the ankles, the next major crux is the knee, right? If your ankle is fully into extension or flexion you're going to have to work rather hard to get your knee out of alignment. Your knee is a hinge joint, just like the angle. The knee joint expresses range of motion between 0 degrees (knee totally compressed as in kneeling) and 180 degrees (knee open as in standing). In between the two is the mid-way, 90 degree angle, as in sitting in a chair with the feet flat on the ground. Those are the three safest positions for the knee. At any of those three angles, the foot angle can either be flexion or extension and the effect of the relationship between the ankle and knee is experienced in the hip. If your knees give you trouble my suggestions are as follows - 

1) Spend a LOT of time kneeling. Start small with a block underneath you for support and work eventually so that you do no need the block. Start with 5 minutes and work your way up to 20 or 30 minutes. Mind over matter, your legs will tingle but if you keep your pelvic floor and core engaged and your focus on your breath you will one day make it that long. Don't expect that to happen overnight or without some tears. When you have sat kneeling for a long time, make sure you give yourself a long time to unwind out of the posture and don't try to stand up right away. Just get in dandasana and let your body process what happened. 

2) Heros pose at least 3 days a week - once you can kneel for about 15 minutes without a block start working Virasana into your practice to help with internal rotation of the hip while the knee is compressed. This is the opposite movement of the hip than lotus pose but as is often the case one must go East to go West. The hip will not externally rotate if the internal rotation component is missing.

3) Start practice your half lotus - in tree pose, on the ground. Get the heel in contact with the abdomen about two inches below the navel and slightly to whatever side leg you are working. Get the very midline of the shin pointing to the ground and then lean forward to help your pelvis tilt anteriorly. Eventually your knee will drop down to the ground and you will have one half of your lotus legs.

Finally what does one do about the hips? If the ankle and knee are in a good relationship to one another, stretching that you do in pigeon, cow-face pose, janu sirsana, fire log pose etc will all work efficiently and effectively and most important EXCLUSIVELY at the hip. Unlike the other two joints, your hip is a ball and socket. The range of motion in the hip is huge comparatively and you need all of it for lotus. In my opinion the hip takes care of itself when the other two joints are in order. One of the most important poses to get your ready for padmasana is fire log aka double pigeon aka agnisthambasana. This pose is a doosey. It slowly torques the hip socket into submission. Often the hip does not rotate out or back all of the way in the socket but this pose will take care of both of those elements. The first time you try this pose however you might find that there is huge gap between your top leg and bottom leg. First, follow all of the aforementioned tips for the ankle, make sure they are both in flexion. You may need to hang the top ankle over the quad muscle of the bottom leg to be unimpinged in your top foot flexion. From there my tips are as follows - 

1) Lean forward and compress your torso onto your legs. This will guide your hip placement and  anteriorly tilt the pelvis so the head of the femur sits all the way back into the socket.

2) If it feels bad in the knee or ankle don't go there yet. That is my advice at every step of the way to lotus. You only have one knee and one ankle per leg. Treat them kindly. Go slow. Do not force things upon your body that it is not ready for.

I will likely do a tutorial or maybe even a lotus workshop here, soon. If you want a great video on how to get into lotus go here. To see all of the above advice in action check out my time lapse from yesterday below. Good luck and let me know if you have any questions in the comments.

The Part-time Job Times: Lessons Learned

The Part-time Job Times: Lessons Learned

I always knew I wasn't cut out for the legal realm but leaving my job as the researcher for a prestigious firm has created moments of intense learning.